The latest camera rumors for 2016


Will Canon have new DSLRs, will Nikon commit to mirrorless cameras, where next for Sony – and more!

For our major end-of-year update we're presenting an all-new camera rumors article, combining the latest industry gossip, emerging trends in the digital photography market and our own tech insights into what each of the major camera makers can do – and what they might do next.
Canon rumors: Will there be a new top-end EOS-1D X II? A new EOS 5D Mark IV is surely due, not to mention the EOS 80D, EOS 1300D and EOS 6D Mark II. Will this be the year Canon finally commits to mirrorless camera with the EOS M4?
Nikon rumors: We think Nikon may try to capture some high ground in the full frame DSLR market with the D820. And what about the Nikon mirrorless range? The Nikon 1 V4 seems a pretty safe bet, but if the stories are true we could also see larger format Nikon 2 and Nikon 3 ranges too.
Sony rumors: Sony's DSLR-style SLT cameras are still going, but for how much longer? 2016 could see the last updates to its A99, A77 and A58 models. But the future for Sony mirrorless cameras looks rosier – we could see new A6100, A7000 and A5200 models in 2016.
Fuji rumors: Fuji has announced a new sensor in 2016. This appears in the X-Pro2 and we expect for this to ripple through its X-mount range, continuing into the X-T2 and X-E3. Fuji's classic X100 compact is surely due for an upgrade too, perhaps re-emerging as a brand new X200.
Panasonic rumors: A new Panasonic GH5 is our top tip for 2015 – Panasonic has enjoyed a lot of success in professional circles with the GH4 and its 4K video capabilities, but Sony in particular is catching up, so Panasonic will surely react.
Olympus rumors: The OM-D E-M1 is the oldest camera in Olympus's line-up of OM-D cameras, and good though it still is, the others have closed the gap – the E-M5 Mark II in particular. Olympus will want to put this right with the OM-D E-M1 II.
GoPro rumors: The GoPro Hero4 Black is a hard act to follow, but growing competition from rival action cam makers will surely spur GoPro into launching the Hero5 – and we should expect another leap forward in video processing power.
There are a couple of major battles going on in the photography market at the moment – and it means that this is an exciting time for anyone interested in cameras.
Firstly, mobile phones have pretty much decimated the entry-level compact camera market, and this is forcing manufacturers to shoehorn-in more and more features to make dedicated cameras more appealing.
This move towards more sophisticated compact cameras has an impact upon the interchangeable lens camera market, which is already the scene of a battle between compact system or mirrorless system cameras and SLRs – the new technology versus the old.
This highly competitive marketplace means there's increasing speculation about what camera manufacturers will be launching over the coming months, and while we can't say exactly what's on the way, we have a few ideas.
We've taken a look at all the main rumours and thought through some pretty sizeable clues to give you our best guess.
In some cases the updates are fairly predictable upgrades to current cameras, and many are on a fairly regular cycle of replacement, so we can estimate the timeframe.
In other cases it's a little more tricky, and we have to try to sift the genuine leaks from the wild speculation. There are also technological advances and direction changes that can throw in a curve ball.
So let's take a look at what we think we might see from the major manufacturers in the not-too-distant future…

8 Tips for Any Photographer Using Any Camera

8tipsanyphotographerhead
As 2016 gets underway, I’d like to share 8 tips on how to take and make better images. To prove that this has nothing to do with how much fancy gear you have, all these tips can be applied to any camera, and all the example images were shot and edited using only my phone.

Tip 1: Teach yourself to recognize good light

I’m putting this up front because I can’t emphasize it enough, and it’s something you can practice every minute of the day, with or without a camera. Photography means, ‘writing (graph) with light (photo)’. Any camera you own is only a light proof box which captures light coming in. Some are fancy, some are simple, but this is always the essence.
static1.squarespace
The single biggest tip I can give you is ‘learn to recognize and appreciate good light’, then capturing it becomes the easy part. Is the light coming in through the trees in a beautiful way? What is the color of the light? Is it bouncing off a reflective surface and doing something interesting? Is it creating unique shadows? If you can learn to see good light you are halfway to becoming a good photographer.
download

Tip 2: Compose your shot

There are many schools of thought on how to compose a photograph, but a solid basic principle to start with is the good old ‘rule of thirds’. You want to imagine breaking your frame up into 9 blocks of equal size, and the easy way to do this is to mentally draw two vertical and two horizontal lines across the thirds of the frame.
download (1)
Now to use this pattern in your framing you either want to compose any interesting vertical or horizontal lines on these imaginary thirds, or you want to place any points of interest on one of the four intersections of these lines. It sounds complicated but the idea will click quite quickly if you give it a go, and it will serve to get you thinking about how shapes intersect and arrange within the frame.
download (2)
On top of this it will give you a more pleasing composition than just pointing your camera straight at a subject. The trick then is to learn this, and other techniques which get you thinking about arranging elements within the frame, and then learn when to break the rules. Here are a couple of examples of using the rule of thirds:

Tip 3: Content is king

It’s almost a cliche at this point but it’s as true as ever. You have to ask yourself what you’re shooting. What is your subject? Is it interesting? Is it too obvious to say that shooting something engaging will make for an engaging photo? It may be redundant but if you think your shots are too boring, the problem may be this simple. Shoot something which tells a story, or freezes a moment in time. That day the kids were playing with that pile of leaves. That light setting over those hills. That guy on the street in that crazy hat.
download (3)
Remember that what you put in front of the lens will make the photograph, not the camera. You can’t blame the gear. Better cameras only make incremental differences to the quality of the capture, but it cannot make up for a boring subject. A boring scene shot on the best camera in the world is still only a boring photo, but a compelling scene shot on a mobile phone can win awards.
download (4)

Tip 4: Don’t neglect your background

You may be out shooting a particular person or thing, but your subject will only make up a portion of your frame. Ask yourself what you are filling the rest of the frame with. By rotating around your subject a bit you will totally change the background they are set against in the composition.
download (5)
How bright or dark is the background? What is the dominant color of the background? Does it serve to separate them and highlight what’s going on, or does your subject get lost against the scene behind them? If your background isn’t working, notice it, and shift position. You have a subject, now move and frame them to place them in the scene.
download (6)

Tip 5: Look at something from a different angle

We are used to viewing things from 5-6 feet off the ground but you may discover a unique shot if you can find a way to get above your subject, or shoot it from below somehow.
1451494114469
Perhaps you can get right up close, or shoot it from an interesting angle. Remember to think outside the box and experiment with where you place the camera to give us a fresh vantage point on a familiar subject.
download (7)

Tip 6: Catch the detail

On top of shooting people and places, notice the little things. Keep your eye out for the small details we all walk past everyday. By getting in close with your camera, you could be giving us a glimpse into a world we never stop to notice. Think about textures in the concrete, patterns on the leaves, insects, shapes in bark.
1451494185812
Most mobile phones today will allow you to get very close and maintain focus, with the added bonus that you will force the background out of focus, giving you that sexy blur for your shot which people associate with higher end cameras. Give it a go.
download (8)

Tip 7: Look for lines

Everywhere we go we are faced with lines. Telegraphs poles. The horizon. Chem trails in the sky. Tree trunks. Roads. Think about how you can use these lines to point out your subject or create an interesting shape in the frame.
1451494211359
Sometimes you can use these lines to literally point at your subject by placing them at the convergence of these lines within the frame. Sometimes you can use the lines to create a frame around the subject. Start to notice the lines around you, and use them to your advantage.
download (9)

Tip 8: Wait for the decisive moment

This is where all the tips above come together in a moment. Many times people will put the camera to their eye to take one picture. For example, Mom wants to snap a picture of her kids playing in a stream. She lifts the camera, clicks, and thinks ‘job done’. But what if you watch a little longer, adjust your position, look at what the light is doing, observe how your subjects are moving, and wait for the moment something magical happens? This is the difference between simply taking a picture or actually making a picture.
download (10)
Henri Cartier-Bresson, who is considered the father of street photography, coined the phrase ‘the decisive moment’ to express that confluence of events which make a good shot. He would camp out in a spot where he knew the light was good and the composition worked, and then wait for the magic to happen. Obviously we don’t all have the time to shoot like this, but maybe his attitude helps us take a small step away from a ‘quick snap’ mentality, towards actually creating a memorable image by staying with the moment and remaining aware of all the elements we’ve spoken about, to create a unforgettable photograph.
1451494482650
Best of luck. Share what you come up with, and happy light-writing in 2016!

The Hidden Benefits of Panorama Photography

The Hidden Benefits of Panorama Photography

Since the early days of film, panoramic photography has been synonymous with landscape and architectural images, and sometimes with other genres like street and wildlife photography. By combining two horizontal frames of film, typically 120 medium format, some film cameras actually shot panorama photographs by design. Most of these cameras emerged in the latter half of the twentieth century, bringing the panoramic format to the public eye. The panorama had existed long before this time, of course, but its popularity has only grown — and with good reason. Panoramas are fun and dramatic, and their subtleties are just as important in today’s mostly-digital age as they were during the heyday of film. In this article, I will discuss some of the important but less-common benefits of taking panorama images, as well as sharing a set of my photographs from Iceland in the classic 6×17 aspect ratio.
Some of the positives of panoramic photography are obvious. By stitching several frames into a panorama, you can take wider-angle photos than your lenses typically allow. For landscape and architectural photographers especially, an ultra-ultra-wide perspective is always useful. Of course, many photographers simply like the extra resolution that comes from stitching several frames together — it allows for larger, more detailed prints, along with more cropping ability in post-processing. Even the relative uniqueness of a panoramic frame has some appeal, since most photographs are taken without switching from the camera’s native 2×3 or 3×4 format (or perhaps the Instagram-famous square aspect ratio). However, there are more benefits to panoramic photography than what may first meet the eye.
Mountain Pass
NIKON D800E + 105mm f/2.8 @ 105mm, ISO 100, 1/6, f/9.0

1) Composition

I briefly discussed the compositional benefits of panoramas in my article on balance, but it is worth going into more detail here. For starters, consider the image below.
Abstract 3x2-2
Brief Note: One of the many benefits of writing for Photography Life is that I get to show my abstract circle art to thousands of unsuspecting viewers whenever I write an article about composition. I’m bad at Photoshop and I’m even worse at abstract art, but I’d be lying if I said I didn’t enjoy this.
In the sample above, you can see that this image is poorly-composed. Ignore the fact that I can only draw circles in Photoshop, and notice how crowded the frame is along its edges. If this were a real landscape, the logical decision might be to zoom out slightly to give more breathing room on either side of the image. Unfortunately, zooming out is not always an option. In this abstract example, the boring white space continues indefinitely above the frame, and the foreground is ruined because — of course — someone littered. The best way to fix your abstract composition, then, is to photograph this frame as a panorama.
Abstract Panorama-2
Here’s the panorama, just for kicks.
A real-world example is shown below. In this image, the sky and ground were entirely featureless — foggy and silhouetted respectively. Although I could have used a 2×3 aspect ratio and zoomed in a bit more, I would have had to crop out the sides of the mountain to do so, and the image would not be as strong.
Fog
NIKON D800E + 105mm f/2.8 @ 105mm, ISO 100, 1/2, f/11.0
Along with the extra room for composition, the panoramic format makes it easy to balance the items in your frame. A panorama is inherently so wide that it is very difficult to tip off-balance, which certainly is not the case with traditional rectangles. Even bright, attention-seeking items in your frame are not nearly as important when they take up a small percentage of the image. In the panorama below, for example, the largest bright area is directly along the right-hand side of the photograph. Normally, this would be a textbook example of imbalance. However, the sheer number of other items in the frame — most of which would not be visible in a 2×3 or 3×4 photograph — render this bright spot of sky almost inconsequential to the image’s overall balance.
Wild Places
NIKON D800E + 105mm f/2.8 @ 105mm, ISO 100, 1/6, f/11.0
The compositional side of panoramic photography certainly is not the only reason for its popularity, but panoramas are useful for images that cannot be composed in more typical ways. Often, I use the panorama format simply because the spaces above and below my subject would boring with a 2×3 frame — other times, I do so to make my image easier to balance. Panoramas are not ideal for every composition, but they are crucial tools in more situations than you may think.

2) Large Prints

I briefly mentioned the increased detail that comes from stitching several images together — and such detail certainly is welcome — but it is not the only reason that you can print larger images from the panoramic format. Consider a typical (high-end) photo printer: the width of the print is set at a certain size (since, say, a 24-inch printer simply cannot fit anything larger), but the length of the print is essentially unlimited. The reason is that, past a certain size (typically 13×17), photo paper tends to come in rolls rather than sheets. These rolls can be tremendously long, often more than fifty feet (15 meters).
The implications for panoramic photography are clear. If your roll-paper printer works up to 24 inches (60cm), the size of your frames is only limited to your photo’s aspect ratio. If your file has a 3×4 ratio, for example, you can print no larger than 24×32 inches. A 2×3 frame gets you to 24×36 inches, whereas a 1×2 image can print up to 24×48 inches in size. If your roll isn’t out of paper yet, a 1×3 panorama can be printed at a massive 24×72 inches in size. The numbers themselves are not particularly important here, but the size differences are — once you hit your printer’s limit, a 1×3 panorama can be exhibited twice as large as a 2×3 image.
Even third-party printing companies work the same way. At Bay Photo, for example, the maximum size for a 2×3 ratio print is 30×45 inches (75×115 cm). But, if your image has a 1×4 aspect ratio, you can get a 30×120 inch print — that’s ten feet wide (three meters) on the long side. For most photographers, a print of this size is never going to be a practical option. However, even smaller prints benefit from a panoramic aspect ratio.
Above most sofas and beds, for example, the wall is wider than it is tall. Quite often, the difference is significant. And, for landscape photographers who want to sell their work, home decoration is one of the largest markets. It makes sense to cater to people’s needs, then, and panoramic art is disproportionately popular for bedrooms and living spaces.
Sunset with a Storm
NIKON D800E + 50mm f/1.4 @ 50mm, ISO 100, 1/6, f/16.0
For other photographers — those who exhibit at shows and galleries — panoramas help to stand out against other prints on the same wall. Although it is not true in every case, many galleries want a consistent height for their images rather than a consistent length. This means that panoramas are displayed quite large, and thus are more likely to attract attention than typical images.
Not all photographers print their images, of course, so this comparison is not always valid. Still, you never know if one of your images will be in a gallery show at some point, and it is worth the effort to take images with a wide aspect ratio if this occasion arises. I recently visited a gallery of this sort, where the panoramas were far larger than the other prints. They were also, it seemed, among the most popular photographs on display. And, being stitched images, they were just as detailed — if not more so — than most of the other prints in the gallery. If your end goal is a print, keep the panoramic format in mind; panoramas lend themselves to large display more than any other aspect ratio.

3) Extracting Multiple Images

When I visited Iceland over this past summer, I saw some of the most magnificent landscapes of my life. Some locations actually were too beautiful for me to choose a subject quickly — they were almost overwhelming. In a few instances, I took massive, multi-row panoramas for my composition, rather than singling out specific subjects in the field.
Electric
NIKON D800E + 105mm f/2.8 @ 105mm, ISO 100, 1/10, f/16.0
This is not my typical method of composition, but it is worth noting Iceland is so beautiful that I rarely needed to crop my vast panoramas at all — everything in the photo was interesting enough to keep. It also is worth mentioning that the photograph above, a prime example of this technique, is more than 230 megapixels in size — detail that is readily visible in a print. I can print this image about seven feet wide (over two meters) at more than 300 dpi, for example, and at least twice that size without a dramatic loss in quality. The “hidden benefit” is that I can extract ordinary 2×3 photographs from this massive panorama, and the insane number of pixels means that I don’t sacrifice image quality along the way. Consider the image below.
Electric-2
NIKON D800E + 105mm f/2.8 @ 105mm, ISO 100, 1/10, f/16.0
If I were making a set of 2×3 images from Iceland, I would be able to use this photograph without any issue. The perspective it brings is entirely different from the main panorama, and it stands on its own as an interesting scene. Plus, it is still more than 24 megapixels in size — more than enough to print at any reasonable size.
What if I wanted a 9×16 image for my desktop background? I can focus on another part of this panorama and get an equally interesting shot:
Electric-3
NIKON D800E + 105mm f/2.8 @ 105mm, ISO 100, 1/10, f/16.0
This image is, again, a crop from the original panorama. This time, I chose to focus on the mountains on the left-hand side of the frame, which look beautiful in the morning light. Again, this image works well as a crop, and it is not missing much from the original photograph. Plus, it’s more than 100 megapixels — large enough for a print of any size.
Although I do not recommend this approach for everyday photography, there is something to be said for extracting several individual images from a panorama. At the very least, it forces you to consider the large image as a combination of individual compositions, a different thought process that can help you decide what deserves inclusion in the frame. Plus, with the massive detail inherent in stitching photographs together, there is no significant loss in quality if you do choose to crop several versions of the image in post-processing.
These three extra benefits of panoramas, then — composing with more freedom, printing with a larger size limit, and extracting several images per frame — are not definitionally hidden, but they certainly aren’t as obvious as the other benefits of panoramic photography. No matter your preferred genre, panoramas can be a versatile tool in your arsenal — perhaps for more cases than may be clear at first.

ZTE Spro 2 Review and Giveaway

ZTE Spro 2 Review and Giveaway


A couple of weeks back, AT&T sent me a ZTE Spro 2 Smart Projector to review and give away to one of our readers. I loved the idea of doing this, not only because it is a neat little smart device that you can use as a mobile hotspot and as a projector, but also because with the holiday spirit, why not gift one of these away to one of PL’s readers? After-all, our site is all about giving! Speaking of gifts, hope you’ll get what you need this holiday season, because it does not always happen. What do you do with those unwanted gifts then? I find regifting to work the best. For example, on my birthday earlier this year I received a gift card to a store I never shop from, so I decided to regift it to a friend who does. Worked out nicely and I did not even have to think much about buying a present! Now the question is, if you win this giveaway, will it be a keeper? Anyway, before I go into the giveaway details, let’s take a closer look at what the ZTE Spro 2 is capable of and what you can use it for.
ZTE Spro 2

ZTE Spro 2 Overview

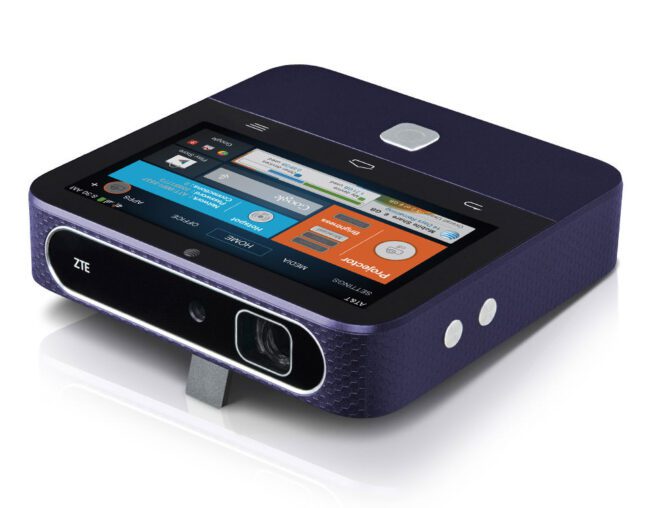
In a nutshell, the ZTE Spro 2 is an Android-powered portable projector that can be also used as a mobile hotspot for connecting up to 10 devices via WiFi to a 4G LTE network (the particular unit that I am reviewing and giving away is specifically for the AT&T network). It is a smart device with a 5″ touchscreen, which means that you can use it just like an Android-based tablet to check email, browse the web, watch movies, play games, etc. Although ZTE describes the Spro 2 as a “2-in-1 projector and mobile hotspot”, I would instead call it a “3-in-1 projector, mobile hotspot and tablet”, since the latter is an integral part of this portable device. So when not using it as a hotspot or a projector, you can still connect to the Internet via a mobile connection (requires a data plan) or WiFi, which is really neat. The only downside on the “smart device” side is that the unit ships with the older Android 4.4 “KitKat” OS and not the current “Lollipop” version, so you might miss some of the apps specifically designed for Lollipop on the ZTE Spro 2. Featuring a fairly powerful Qualcomm Snapdragon 800, the device should be able to technically run Lollipop, but there might be technical challenges to get all the components, including the projector working on the new OS. I might be a matter of time until folks at ZTE can get the Spro 2 working with the latest and greatest Android OS, but even if that never happens, I don’t think I would be very disappointed, as the highlight of the device is definitely the projector + the hotspot and not the tablet features…
As you will see further down in this review, the ZTE Spro 2 has a wonderful and compact built-in projector capable of outputting up to 720p video in 4:3 or 16:9 aspect ratio, which given its compact size (5.3″ H x 5.2″ W x 1.2″ D) and light weight construction (only 19.4 oz / 0.55 kg) is pretty darn impressive. That makes the device a nice travel companion – you can carry one in your camera bag when traveling! And when you are ready to project, all you have to do is press the power button, then touch the “Project” button on the touchscreen and voila – you are projecting. With a lamp life rated at 20,000 hours, the projector should last quite a while.
The ZTE Spro 2 can be purchased either in a WiFi-only or LTE + WiFi package. The LTE + WiFi package is the way to go in my opinion, because you can use it as a hotspot to connect all of your devices (like your smartphone, tablet and laptop) and share the Internet connection, which is particularly useful on the road. You will need to activate a SIM card with the carrier and once you do that, all you have to do is enable the hotspot feature through the Settings menu to be ready to accept connections from other devices.
So what would you use the ZTE Spro 2 for? If you are a videographer, the device could be used for video presentations. Being able to fire up a projector and show a video to your friends, family or co-workers on a huge wall is really cool. You don’t have to worry about finding a huge TV and you can sit back together with the audience to present the material. Although the video resolution is limited to 720p, which means that you can only output at a maximum resolution of 1280×720, you can still use the ZTE Spro 2 for showcasing your photos as well. The colors and the details might not look the best, but at the right viewing distance, it actually does not look bad at all, as you will see below.

Construction and Build Quality

The ZTE Spro 2 for AT&T has a high-quality exterior plastic shell colored in dark blue, with the exception of the glass touchscreen area. All corners are nicely rounded and there is nothing sharp on the unit that could potentially scratch other devices. Although the 5″ touchscreen seems to be made out of tough glass, I would recommend to keep it away from sand and other sharp objects that might scratch the screen. Store it in the provided ZTE case when not in use and if you want to avoid any potential of scratching, it might be best to use a screen protector. The same goes for taking care of the front of the unit where the projector sits. The projector front lens is protected by a single piece of glass and if you manage to heavily scratch that glass or make it extremely dirty, it will affect the projecting performance of the unit.
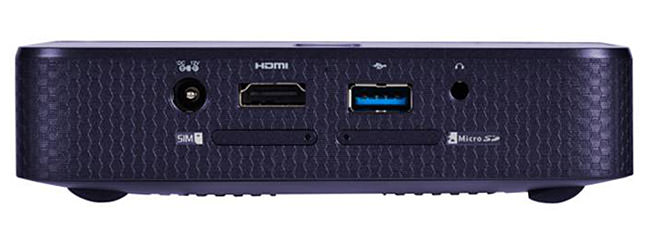
On the left side of the unit you will find two buttons for adjusting volume, while the right side only has a small venting area. The bottom of the unit has a well-vented black plastic shell where you will find four soft rubber feet, a small kickstand and a tripod socket for mounting the unit. The rear of the device has all the connection ports, which includes power input, HDMI input, a USB 3.0 port and a headphone / speaker output plug. Right below those ports you will find two additional ports – one for inserting a SIM card and one for a MicroSD card (the device supports MicroSD cards up to 64 GB in size):
ZTE Spro 2 Rear Connections
The 5″ touchscreen has a resolution of 1280×720 at 294 PPI (921,600 dots), which can be set to be quite bright. Fonts, imaged and videos look great and the touchscreen is very responsive, having a very similar feel as what you get on a high quality smartphone.
Overall, the ZTE Spro 2 feels like a quality device that is built very well. Without serious abuse, the device should last a while.

Battery Life and Memory

The ZTE Spro 2 comes with a large capacity 6300 mAh battery, which according to ZTE should provide up to 2.5 hours of continuous projection. That’s plenty of time to watch a full-feature movie and still have some time left to project. In fact, on a fully charged battery, I was able to squeeze over 3 hours of projection, which is really nice! And if you utilize the device itself without using the projector, say for the hotspot or tablet functionality, you can expect to get much more running time – up to 16 hours!
The device comes with 2 GB of internal memory (RAM) and 16 GB of storage space (ROM). While 16 GB does not sound like a lot for storing music and movies, keep in mind that you can easily expand the storage with a 64 GB MicroSD card. And if you find that limiting, no problem – just use an external USB drive! I connected my Samsung T1 Portable SSD drive and after a couple of seconds, the Spro 2 showed the drive contents to me. I was able to browse the folders and play back photos and videos I had on the device. The SSD drive was NTFS-formatted, but if you have Macs in your environment, the device will be able to read HFS+ formatted drive contents as well. So you don’t have to worry about constantly fiddling with the MicroSD port to copy / access your media – just use an external hard drive and you are all set.

LTE, WiFi and Bluetooth

The ZTE Spro 2 ships with LTE-capable antenna, so you will be able to access the network at very fast speeds (Frequencies: 850/1900/2100MHz, LTE bands 2/4/5/17). So if you are near LTE towers, you should not have to worry about network speed issues, particularly when sharing data across multiple devices. As for WiFi, the device supports 802.11 b/g/n networks at 2.4Ghz and 5 Ghz, which is more than plenty. And lastly, you can connect your devices to the Spro 2 via Bluetooth 4.0.

Projector Output

When using the Spro 2 on battery, you can project up to 10 feet with 100 lumens. Not super bright, but if you do it in a dark environment, it actually looks pretty decent. If you have a power outlet, you can double the brightness to 200 lumens, which is more than enough to bring small theater-like experience to a room. I was actually quite surprised by the brightness and quality of the projector output when using it in my home environment. At first, I thought 720p would look pretty average on a large projection, but after I fired it up, I was pleasantly surprised by how good 720p actually looks when properly focused. Here is the main screen of the device that I output on a large bedroom shade (which worked out great, by the way!):
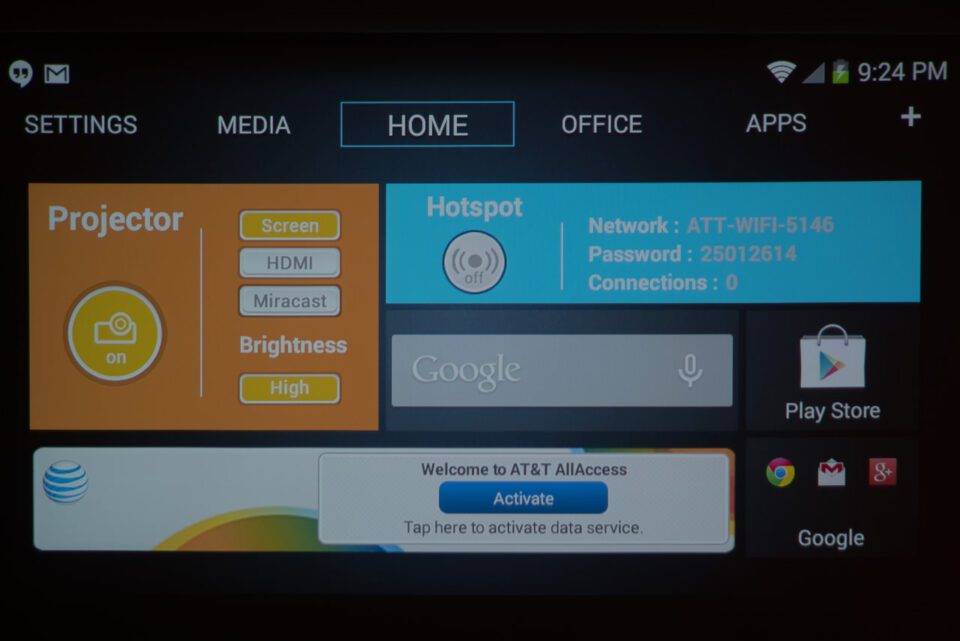
ZTE Spro 2 Main Screen
There is a bit of pixellation seen at very close distances, but come on – projectors are not meant to be seen with a loupe! At the right viewing distance, the image looks quite detailed and nice.
So what did I view next? I fired up the YouTube app and launched the Star Wars Episode 7 trailer of course! I am super excited about the premiere on the 17th and although I was not able to get tickets for the first day, I have the tickets for the morning of the 18th – my boys are pumped up and are counting days :) Not bad at all:
ZTE Spro 2 Episode 7 Trailer
Projecting Episode 7 Trailer
Next, I opened one of my images to see how it would display:
ZTE Spro 2 Photo
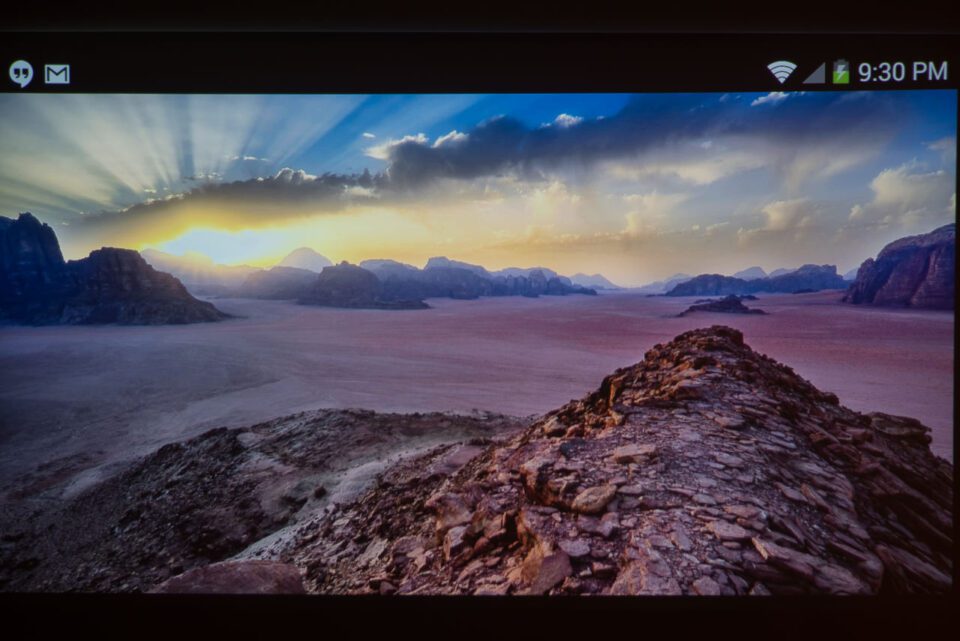
Projecting a JPEG photo
The image was obviously downscaled to fit and it actually looked pretty decent. You can definitely use a projector like this for presenting images, but keep in mind that the colors and the tones are not going to be very accurate. Plus, if you move the device too far back and the room is not completely dark, brightness might not be sufficient to bring out all the shadows in images. Still, I expected a lot worse from this small of a projector, so I was very happy to see the results.
Focusing with the projector is very easy and there is no manual focus ring to fiddle with – everything is done electronically. Under the Settings menu, you will find a “Projector” icon. From there, you can select your video source (Screen, HDMI or Miracast), Brightness Level, Focus and Keystone. By default, Brightness is set to Medium and when on battery, you cannot move it to “High” – for that, as I have already mentioned above, you need to be plugged in to a power outlet. On my unit focusing was set to Auto, which worked out pretty well, but every once in a while the image would refocus, so I switched to Manual focus. Adjusting focus position is super simple: there is a plus and a minus sign and you move focus whichever way to make the image sharper. The Keystone feature can also be set to “Auto”, which is what I left mine at – it automatically corrects angular distortion to make the output look nicely rectangular. This is great, because you are not expected to always project at a particular angle. You could set the unit fairly low and project higher up or vice-versa and the projection always looks rectangular thanks to this feature. Another great feature I did not expect to see from such a compact and relatively inexpensive unit.
In addition to all of the above, you have all kinds of other tweaks in the Projector settings menu. You can lower power consumption by maintaining constant image brightness, brighten darker image areas to improve overall picture quality, adjust color correction options and even stabilize the projected image with an “anti-shake” option.
In summary, the projection capabilities of the ZTE Spro 2 are very impressive!

HDMI Input and Sound

If you enjoy playing games or watching movies, there is nothing like hooking up a laptop or a game console like Xbox, PlayStation or Wii via HDMI and entertaining yourself or your guests on a giant screen. I am not a gamer anymore, but I did watch some video clips with my family, which they enjoyed a lot! Now I am looking forward to watching a movie. If you have a Roku, or a Chromcast device for video streaming, you can attach those devices easily. You don’t even need to mess with extra power cables for hooking up a Chromcast unit or even a Raspberry Pi – the device provides enough USB power to power those up. To make the projection look brighter, I hooked up the unit to an outlet, which made a huge difference. My only gripe is the fan noise – to keep the projector cool, the unit fires up a pretty loud fan, so make sure that your speakers are louder than the fan noise, or you might get a bit annoyed.
Connecting a Surface Pro 3 or the newer Surface Pro 4 to the Spro 2 is a piece of cake, but you will need a special adapter to convert Mini DisplayPort to HDMI. You can get the accessory from your local electronics store like Best Buy or purchase one directly from Microsoft.
Speaking of the sound output, the built-in speakers on the Spro 2 are pretty loud, but if you are watching a movie, I would recommend to hook up external speakers. That’s what the rear 3.5mm audio jack is for – you can use headphones to go completely silent for your own enjoyment, or you can hook up more powerful speakers when watching with a group of people.

ZTE Spro 2 Giveaway

Now that you are hopefully pumped up about this device, it is time to discuss the giveaway! Yes, we will be giving away a brand new ZTE Spro 2 Smart Projector ($500 value) to one lucky reader. To participate, all you have to do is leave a comment in the comments section below with an answer to the question “How would you use the ZTE Spro 2 if you were to win it?“. We will randomly select 5 readers and choose a single winner among them based on their comment. So don’t just leave one or two words!
Please see the following giveaway rules:
  1. Giveaway is only open to US and Canada residents
  2. Participant must be 18 years and older
  3. Only one comment per participant
The winner will be announced shortly, on December 15th, 2015!

AT&T’s 12 Days of Giving

In addition to our giveaway, AT&T is currently hosting its “12 Days of Giving” program, where the company is promoting special deals every day for 12 days straight. The program started on November 30th and will stop in 4 days, on December 11th. Check out the link above to see the details. In addition to this program, AT&T is also hosting its #ATTGiftSweeps Holiday Sweepstakes, giving away all kinds of great prizes for 12 days straight between December 1st and 12th. To see the prizes and to participate in these sweepstakes, head over here. AT&T is giving away way more stuff than we are!
Good luck and happy holidays everyone!

Fireworks Photography Tips

Fireworks Photography Tips


Getting Ready

Photographing Fireworks - A beautiful full display of fireworks
When you are going to photograph fireworks, be prepared. Make sure you have enough memory cards and extra batteries. You will need to take a tripod, a wide-angle or a telephoto zoom lens, and remember to arrive early. Place the camera on a tripod, and turn the mode dial to M (manual) mode; we want f/8 - f/16 for a greater DOF (depth of field) and a long exposure anywhere between 1-10 seconds. Use your camera’s self-timer or a cable release to take the photo with absolutely no blurring. For dramatic effect, try to capture multiple fireworks trails across the sky.

Include People

Photographing Fireworks - Fireworks in a fireworks contest with a silhouetted crowd
Position yourself in a good spot at the center of the action. It’s a great idea to include the heads of other visitors, as it gives a sense of perspective and dimension. Place you camera on a tripod and choose a large aperture to keep things fairly sharp. Set your ISO at 100 to keep the digital noise at a minimum. Wait for multiple fireworks to go off, and use a cable release to take the photo. Don’t use flash because it could ruin the effect in the image, and take a longer exposure to catch various stages of breathtaking fireworks.

Use a Slow Shutter Speed

Photographing Fireworks - Fireworks over city with reflection in river
When it comes to shutter speed, you should pick a slow exposure, anywhere between 1 - 15 seconds in order to capture the light trails. The longer the exposure, the more lines will appear and the longer they will look. Any faster would not catch the extended moment of the fireworks exploding. You should take the image using the camera’s self timer or a cable release so that you avoid touching and jiggling the camera. If you don't have anything to hold your camera steady, increase your camera's sensitivity to light by increasing the ISO. This will give you shorter exposures without blurs, but be prepared for more grain or ‘noise’ in your fireworks pictures.

Click Away

Photographing Fireworks - Fireworks with reflection in lake
Snap up the action, but avoid shutter lag (the time it takes between pressing the trigger and the camera taking the picture) by keeping the shutter button pressed halfway. When the right moment comes, press all the way down to instantly capture the desired image. Let the smoke clear away before taking your next shot, so as to reduce the need to edit the fireworks photos with software later.

Shoot from a Distance

Spectacular display of fireworks in New York City
Mount the camera on a sturdy tripod and position it so that the bridge, the water and buildings can be seen; we want interest in the foreground and background. Set the mode dial to AV (Aperture Priority) mode, set the ISO at the range of 100 to 400 and choose an aperture of f/16 or more. Ideally we want a long exposure anywhere between 1-30 seconds for a silky water effect. Use a wide-angle lens (10mm - 42mm) for a broad perspective. You’ll want to disengage the autofocus on your lens, and set it to Infinity (the sideways 8 on the lens barrel); this isn’t always apparent on some digital lens, so you have to figure this out for your given lens. Use your camera’s self-timer or a cable release to take the photo with absolutely no blurring.

Recommended Settings

Use the lowest ISO possible to keep the image high quality, and a slow shutter speed to capture the light trails. You don’t want to be any faster than 1/15s, though some shots may require even longer shutter speeds if you use a small aperture. If you are finding that the camera is not recording enough light for the fireworks, reduce the ISO down to 50 and choose the smallest aperture, at around f/32. This will force the camera to give you a slower shutter speed, while giving you a very high quality image.

Recommended Equipment

Always take a tripod – there’s no other way to use a long shutter speed without getting camera shake. Use a telephoto zoom lens if the fireworks display is far away from you or a wide-angle lens if you want to capture the surroundings or the people at the event too. Remember to use a low ISO for a high quality image and you can also choose a small aperture for a sharp picture, although your camera must be on a tripod for this. Use a shutter release cable or a remote to take the picture – you can’t use self timer as you can’t predict exactly when the firework will go off.

Conclusion

One of the most important things when it comes to shooting fireworks is timing. Always keep an eye out and get used to predicting when a firework will burst - you don’t want to capture it taking off or when it has finished. You want to photograph a firework as it makes its colorful burst. W

Night Sky Photography Tips

Night Sky Photography Tips

1.Star Trails
Star Trail image taken during the Okie-Tex Star Party in the Black Mesa area of Oklahoma
Due to the Earth’s rotation about its axis, it seems that the light from stars moves in circles around the celestial pole. These movements are detectable after about 5 to 10 minutes, and can be traced by your camera in the form of a streak. To photograph this magical effect, you need a sturdy tripod and lots of patience. Focus the lens to infinity and set the camera’s mode at Manual or Bulb shooting mode. With the use of a cable release you will capture the stars moving across the sky. These exposures can be a few minutes to several hours long. If you keep few things in mind, such as the timing, composition, and power of the battery, you can make photographing star trails simpler for you.
 
2.Find the Right Location
Tree at night with star trails in the sky
The best place to view and photograph the night sky is in the rural countryside because cities have artificial lights which cause a phenomenon known as light pollution. You need to get away from artificial lights in order to see the stars well. A truly dark sky is preferred, but artificial lights keep the night sky from being truly dark. Many beginners aim at capturing the longest star trails by keeping the shutter open for long periods of time. However, they tend to underestimate the impact generated by ambient light in the sky, which can be hard to notice at times. In addition, residual light (such as moonlight) can have a devastating impact on long shutter speed photos. This is because when you keep the shutter open for say, nearly 20 minutes, an hour after the sunset, the camera may perceive it as a day shot. Similarly, a full moon night photo with an exposure time of around 10 minutes could also look like a day shot. Therefore, it is best to attempt such a picture with either a new moon, or well before the moonrise or after the moonset. The light emerging from the stars would be more evident at this time and the picture would be perfect.

3.Use Long Shutter Speeds
 
Long exposure of star trails passing by an illuminated tree
When photographing the night sky with a long exposure, exposures of 15 minutes or longer will show the rotation of the Earth. You’ll need a wide-angle lens and a sturdy tripod, of course. You’ll want to use a cable release to eliminate camera shake of any kind, as it will RUIN your photo. Focus the lens to infinity and set the camera to B "Bulb" shooting mode. Set your aperture between f/2.8 and f/4 for optimal results, and depress the remote to open the shutter. You should keep your ISO at 100 to keep the digital noise at a minimum, because the sky is so dark and less prone to producing digital noise when the exposure is above 15 seconds. To complete the photo after your desired elapsed time, depress the remote again, and release the shutter.
 
4.Auroras and Polar Lights
Night sky with faint Aurora borealis
Photographing the atmospheric phenomenon of aurora borealis is a challenge for photographers. This difficulty is due to frequent spectacular changes in the brightness of the light. The charged solar particles move very fast and sometimes get hidden making it impossible to shoot them. However, if you follow these tips, you will be able to get the best aurora borealis photos. Anchor your camera on a strong tripod to keep it steady for longer exposures. Set the ISO at the range of 100 to 400. Shutter speed can be as long as 30 seconds depending on the amount of light available. Do not rely on the built-in light meter, which is better left for day time use. Although any kind of lens will do for aurora borealis photography, you should choose a wide-angle and faster lens.
 
5.Cloudy Skies
An old stone church at Lake Tekapo, New Zealand silhouetted in the moonlight
As the light begins to fall, look at the cloudy skies. Watch the colors and how they merge though the cloud. Even though it is dark, you should try using an 80A blue cooling filter to enhance the blue cast of the sky and to reduce the yellow cast from the artifical lights. Use a wide-angle lens and opt for longer exposures. You can first try a few test shots, and then assess them carefully on your digital camera. You should be able to decide on the best range of exposures to capture some good photographs of an overcast sky.

Recommended Settings

Metering after dark can be a problem, so make sure you choose the best option for your particular situation. If the conditions are both light and dark you need to use spot metering for an accurate reading. If the darkness is even you can use center weighted or evaluative metering. Don’t use flash if you can help it as this can affect the resulting image, creating an area of the photograph that is over-lit. Manual and Bulb modes are the best shooting modes for this kind of photography.

Recommended Equipment

Night skies should always be photographed with the assistance of a tripod. Don’t forget to buy a cable release or a remote control for taking the picture – this is important because some shots will take up to 30 seconds or even more. Your lens ideally should have an infinity focusing mode and your camera should have the ability to do a mirror lock up - a feature in which the mirror in the camera moves out of the way before the shutter is released. This feature eliminates the vibration that occurs when the mirror slaps up into the camera housing. A wide-angle lens is the best choice for night skies, and a zoom makes it even more versatile.

Conclusion

When taking pictures of the night sky, remember that patience is as important as is the ability to look at an image’s composition critically and decide what you need to change next time to make it better. As we stated earlier, the process of finding the right exposure length for the image you want is going to be a process of trial and error (in terms of lens length, shutter speed, aperture setting, as all three allow for different effects). With long exposures of over 30 seconds, a cable release is necessary to ensure tack sharp final images. For additional variety and perhaps better photographs of stars in the sky, you might want to try a few B&W shots. Dress warmly if the weather is cold, because sitting still on a cold night is much colder than walking in the cold, so extra layers may be needed. Remember to take a flashlight with you so you can adjust your camera in the dark.