Adobe Photoshop Lightroom 5 Review
Adobe’s recent change of license strategy for most of its Photoshop family software tools has introduced a lot of doubt among the previously happy customers. Because of Photoshop CC, many owners of Lightroom 3 and 4 have started looking for alternatives, fearing that despite Adobe’s claims, there is a possibility that Lightroom will also be moved to a subscription-based license in the future. Such fears are further complimented by the fact that the older versions of Lightroom will never gain support for the newest mirrorless and DSLR cameras, or new lens profiles. For this reason, Adobe had to make sure Lightroom 5 was so good, it would keep its customer base happy and tempted by the new features despite the recent changes in license strategy of its other products. The pressure is made worse by rivals always breathing down Lightroom’s neck.
So, was Adobe successful in providing a stable, capable update for its long-time users? Is Lightroom 5 likely to attract new customers, who previously avoided what may be considered a Camera RAW plugin dressed in a suit of extra functionality? In this article, I will review the latest version of Lightroom and discuss its newly gained features in detail. I will also talk about what could have been better in Lightroom 5 so as to, by the end of the article, help you make up your mind whether purchasing or upgrading to this popular piece of software is beneficial to you.
1) System Requirements for Mac and Windows
Before we dive into all the new features, let’s start out by comparing system requirements to those of the previous Lightroom 4 release. First, here are the system requirements for Mac OS version:
| Mac | Lightroom 5 | Lightroom 4 |
|---|---|---|
| Processor | Multicore Intel® processor with 64-bit support | Multicore Intel® processor with 64-bit support |
| Operating System | Mac OS X v10.7 (Lion) or v10.8 (Mountain Lion) | Mac OS X v10.6.8 (Snow Leopard) or v10.7 (Lion) |
| Amount of RAM | 2GB of RAM (4GB recommended) | 2 GB |
| Hard Disk Space | 2GB of available hard-disk space | 1 GB of available hard-disk space |
| Display Resolution | 1024×768 | 1024×768 |
| Optical Drive | DVD-ROM drive required if purchasing retail boxed version | DVD-ROM, only for DVD-based installs |
| Internet Connection | Yes, for Internet-based services | Yes, for Internet-based services |
And here are the system requirements for Windows OS:
| Windows | Lightroom 5 | Lightroom 4 |
|---|---|---|
| Processor | Intel® Pentium® 4 or AMD Athlon® 64 processor with DirectX 10–capable or later graphics card | Intel® Pentium® 4 or AMD Athlon® 64 processor |
| Operating System | Microsoft® Windows® 7 with Service Pack 1 or Windows 8 | Microsoft Windows Vista with Service Pack 2 or Windows 7 with Service Pack 1 |
| Amount of RAM | 2GB of RAM (4GB recommended) | 2 GB |
| Hard Disk Space | 2 GB of available hard-disk space | 1 GB of available hard-disk space |
| Display Resolution | 1024×768 | 1024×768 |
| Optical Drive | DVD-ROM drive required if purchasing retail boxed version | DVD-ROM, only for DVD-based installs |
| Internet Connection | Yes, for Internet-based services | Yes, for Internet-based services |
You will notice that not much has changed, but the changes that did take place are rather important. As many have noticed in our Lightroom 5 Public Beta Overview, Mac support is now limited to OS X 10.7 (Lion) and newer. This means users of older Mac OS versions are left out and will either have to skip on this and, most likely, future Lightroom versions, or update their operating system to a newer release. Official support for Windows includes Windows 7 Service Pack 1 and Windows 8, although we have received reports that the Public Beta release worked with the older operating system from Microsoft, Windows Vista. Even so, if you are a Windows Vista user, do not be at all surprised if your copy of Lightroom stops working after an update, or fails to update in the first place at some point. As with Lightroom 4, Windows XP support has been completely dropped. While there are many Windows XP users out there that might complain about this requirement, we think it is the right move on behalf of Adobe – Windows XP is more than 10 years old now and it is about time to kill it. In addition, Microsoft is discontinuing support for Windows XP as of April 2014, so you really have no option but to upgrade. Same goes for Vista to an extent – it was by far not the best effort by Microsoft and you’d be much better off with Windows 7 or 8 anyway.
OS restrictions are not the only changes. Lightroom 5 wants a bit more hard disk space with 2 GB’s versus 1 GB for the version 4. I personally think that, today, such a requirement is not really relevant, because virtually everyone will have that amount of free disk space and more. For what it’s worth, my Lightroom 5 directory does take up a little bit more space than that of Lightroom 4.3 (0.99 GB vs 860 MB). There are more files in it, too, by around a thousand. Lightroom takes up additional disk space while working by creating temporary files. Catalog sizes stay about the same after the upgrade, with catalog sizes changing by 1-2% (up or down), depending on the size of the catalog. More importantly, Adobe now recommends twice more RAM when using Lightroom 5 than it did with the previous release. The minimum requirement is still 2 GB of RAM. This surely indicates the new version is somewhat more resource-hungry. However, I haven’t noticed any significant performance changes except for those described in the “Performance Issues” section of this review. I would have expected Adobe to improve Lightroom’s usage of available resources to make it operate faster, especially when it comes to Importing/Exporting images. That said, I am still generally happy with how snappy Lightroom is. It’s just no better than Lightroom 4 in my opinion.
2)New Features in Lightroom 5
Here is a list of main new features in Lightroom 5 compared to previous version:
- Much improved Spot Removal tool
- Radial Filter tool joins Graduated Filter
- New Lens Corrections tool – Upright
- Smart Previews for photographers who like to work on the go
- Video slide shows
- Improved Book Module functionality
- Shares processing engine with Lightroom 4, which means no images from Lightroom 4 Catalogs need to be updated to gain latest improvements (as per update from Lightroom 3 to 4), just the Catalogs themselves
- Small rearrangement of hot keys, most notably – hitting “F” will now engage full-screen preview mode. This is more handy than you may think.
- Support for latest mirrorless and DSLR cameras, plus more lens profiles
- PNG files are now supported
- LAB color readout added
- More options for adding text on book pages using metadata
- More small tweaks and additions from Adobe’s JDI (Just Do It) project
I will go over some of the above changes in detail further down below.
3) Changes from Public Beta
There are a few changes made since the Public Beta was launched. First and foremost, with the help of all the people who tested and provided feedback during the Beta run, over 400 bugs were found and fixed. Also worth mentioning is the now-built-in Behance Publish Service and the expanded Feather slider for the Radial Filter tool.
4) Additional Supported Cameras and Lens Profiles
Here is the list of newly supported digital cameras:
- Hasselblad H5D-60
- Olympus PEN E-P5
- Olympus PEN E-PL6
- Panasonic LUMIX DMC-G6
- Panasonic LUMIX DMC-LF1
- Phase One IQ260
- Ricoh GR
- Sony DSC-RX1R (RX1R)
- Sony DSC-RX100M2 (RX100 II)
- Lightroom 5 now supports tethered capture with the Nikon D600
And here is the list of new lens profiles:
- Canon PowerShot G1 X camera lens
- Canon PowerShot G15 camera lens
- Hasselblad HCD 4.8/24
- Nikon Coolpix A camera lens
- Nikon Coolpix P330 camera lens
- Nikon AF-S Nikkor 80-400 mm f/4.5-5.6G ED VR
- HD Pentax-D FA645 Macro 90mm F2.8ED AW SR
- HD Pentax-DA 560mm F5.6ED AW
- Sigma 30mm F1.4 DC HSM A013 for Canon and Sigma mounts
- Sigma 17-70mm F2.8-4 DC Macro OS HSM C013 for Nikon (link to previous lens release)
- Sigma 19mm F2.8 DN A013 for Olympus and Sony
- Sigma 30mm F2.8 DN A013 for Olympus and Sony
- Zeiss Apo Sonna T* 2/135 ZE for Canon
- Zeiss Apo Sonnar T* 2/135 ZF.2 for Nikon
- Zeiss Touit 1.8/32 for Sony
- Zeiss Touit 2.8/12 for Sony
Unfortunately, Adobe does not seem to want to provide profiles for older lenses, such as the brilliant Nikkor AF 85mm f/1.4Dthat I use. You can go through the hassle of creating lens profiles yourself. To do that, you will need to download the Adobe Lens Profile Creator. If you don’t yet know how to use it, read section 4 of our “Lightroom Lens Corrections” article.
5) Spot Removal Tool Improvements
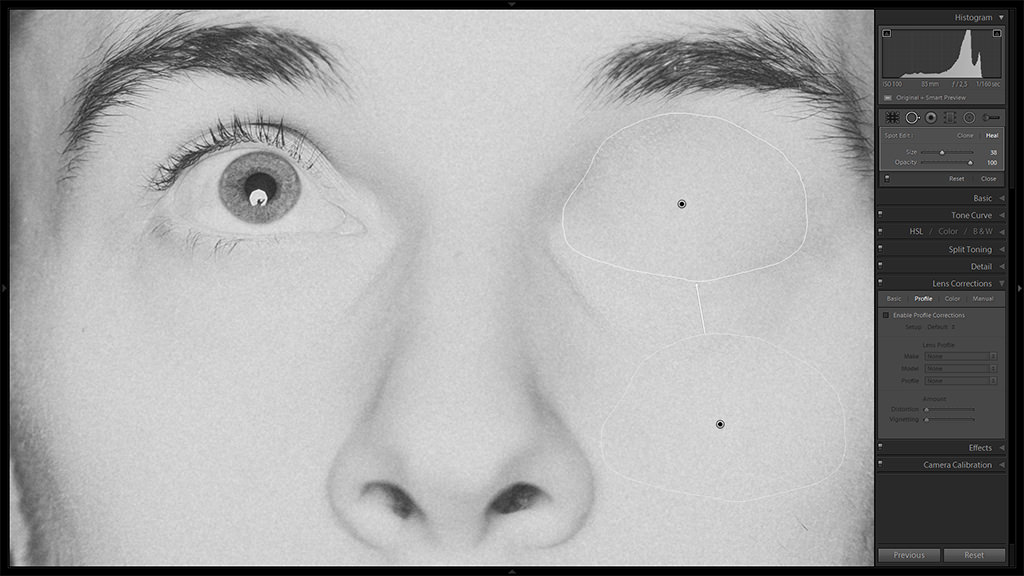
In contrast to Lightroom 4’s limited Spot Removal tool, one you will find in the newest version of the software is much more powerful. It was very capable when dealing with simple blemishes and sensor dust, but much more cumbersome if you had a more complex object to get rid of. Even power lines could prove troublesome and much more simple to remove in Photoshop. In Lightroom 5, the Spot Removal tool is now much more similar to Photoshop’s powerful Clone Stamp Tool. You can draw the shape you need and Lightroom will attempt to clone it. With the greatly added flexibility, all previous adjustments are still available. As I have already shown before, you can now easilyremove someone’s eye, should you wish so :)
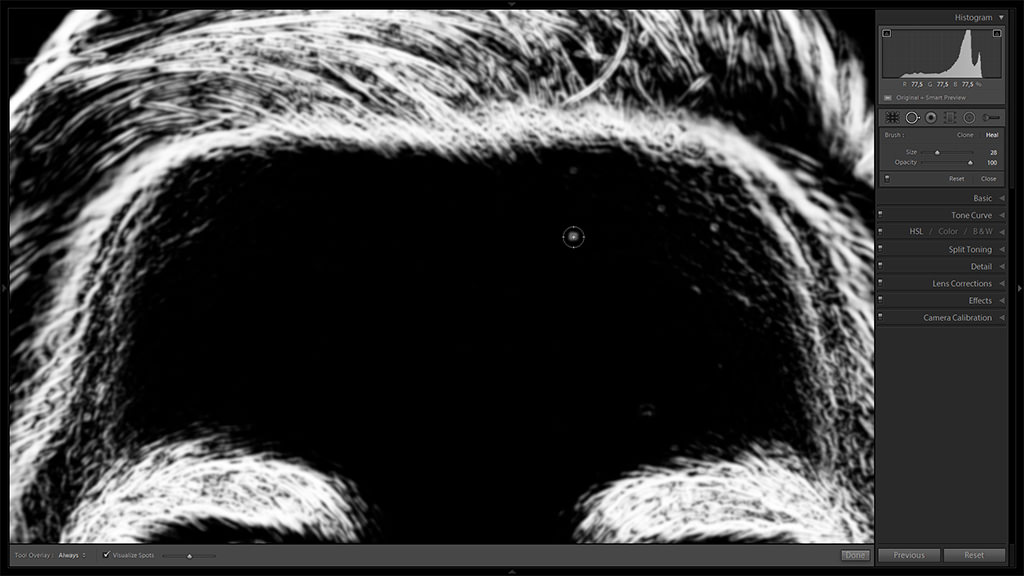
Hit “A” on your keyboard to engage the Visual Spots view mode while using the Spot Removal tool. It will help you better spot sensor dust and blemishes. To fine-tune Visual Spots, hit “T” to toggle the toolbar and adjust the corresponding slider. Moving the slider to the right will show finer detail, whilst moving it to the left will result in a less detailed view. Double-click the slider to go back to default sensitivity. Neat, isn’t it?
6) Radial Filter Tool
Radial Filter is yet another welcome addition to the list of tools available in Lightroom. It acts very much like Graduated Filter and shares most of its settings. As you have probably figured out, the main difference is that it is… radial. Yes. Sounds simple, but this makes the Radial Filter a very powerful Vignetting tool with all the same controls as the Graduated Filter. You can add several Radial Filters and localize vignetting very precisely.

By default, all the sliders will affect the outer regions of the selection. Check the “Invert Mask” option at the bottom of the panel to reverse this behavior and affect the selected region instead. Use the new Radial Filter to guide the viewer’s eye exactly where you want to.
The Radial Filter tool will be covered in much more detail in the upcoming Mastering Lightroom series articles.
7) Using Upright for Architectural Shots

The Lens Corrections panel gets a whole new tab called “Basic”, where you can quickly engage some of the most used features without doing much manual input yourself. It is handy and saves you a couple of steps when dealing with optical imperfections your lens may have, such as vignetting, distortion and so on. Most of the settings in the Basic tab of Lens Corrections panel are not game-changers, but the new Upright feature is quite useful. Upright allows you to automatically straighten the horizon and fix buildings that may be “leaning” or “falling away”. It is not as effective as actually using a tilt lens, but works very well and is achievable with a simple mouse click. For professional architecture, you would still prefer specialized lenses. But for those more casual photographs, it’s an awesome feature to have and, unlike the said lenses, doesn’t cost an arm and a leg.
To use Upright, toggle one of the options at the bottom half of the Basic tab in the Lens Corrections Panel. You can choose from Off, Auto, Level, Vertical and Full. These buttons are used to apply quick horizontal or vertical leveling and perspective correction. Mouse over the following image to see Upright in action:

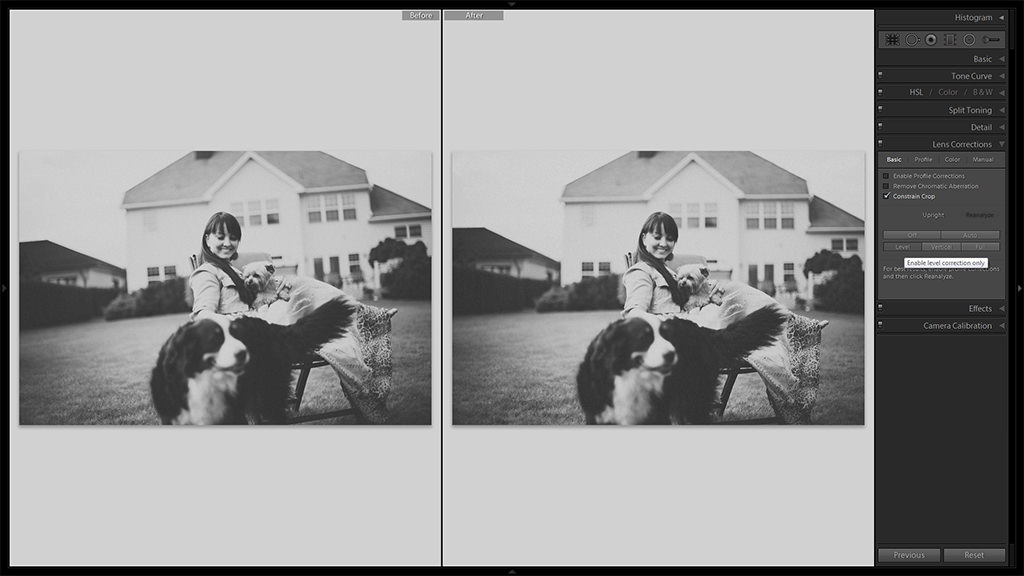
Pretty capable, isn’t it? What you do need to keep in mind is that, good as it may be, Upright is far from being perfect. It’s still software that is judging whether your image is tilted or not, and software is much more prone to making mistakes than you are in this case. Here’s an example where Upright did a pretty good job straightening the horizon. I have the “Constrain Crop” check box ticked to make sure there is no empty white canvas at the border of the image as a result of image rotation:
Here’s a different example, one where Level setting didn’t do nearly as well as with the previous image, despite the many horizontal lines to guide it. Upright actually overdid it:

That sort of error is easy to notice. What is harder to notice is what Upright can do to your image that you would not like at all:
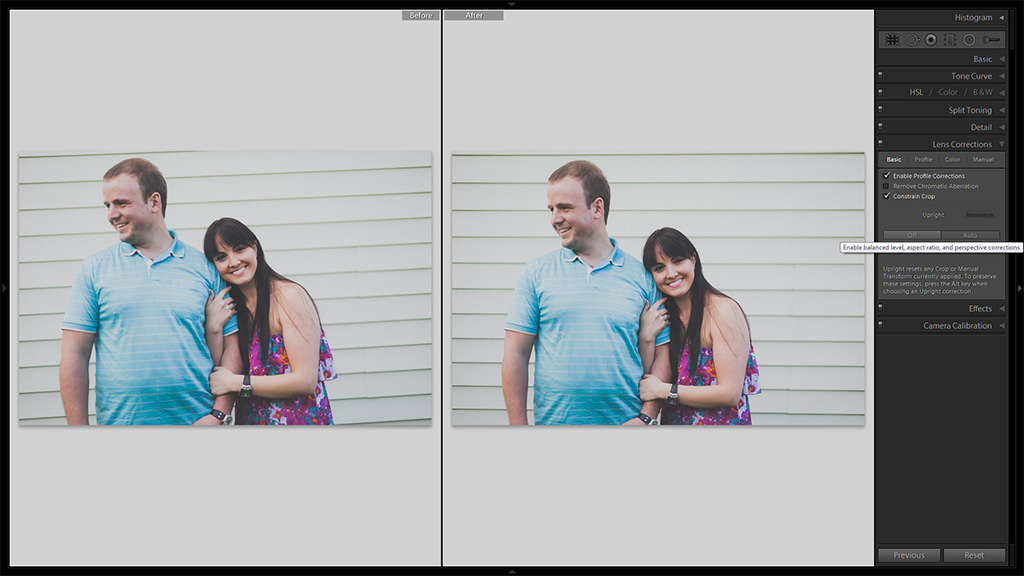
At first glance, everything looks fine and Upright seems to have done nearly as well as you would hope it to after clicking the Auto option. At closer inspection, you will notice the male subject got distorted somewhere in the process. Most noticeably – his face got stretched. Choosing the Full option would make this even worse. Upright behavior has not changed since Public Beta release. To fix something like that, I would need to go to Manual tab and do some well-judged adjustments from there on my own.
Keep in mind that it is better to use Upright with architecture and landscape shots. Be careful when using Upright with images that have people in it though, even if architecture is involved. Consider playing with the settings (some of them can be found in the Manual tab) for best results, or doing things yourself altogether.
If you want to learn more about fixing optical imperfections with Lens Corrections panel, read our “Lightroom Lens Corrections Explained” article.
8) Smart Previews and When to Use Them
Smart Previews is a new feature previously introduced in Lightroom 5 Public Beta. Smart Previews allow you to make changes to your images, look up and copy settings even without actually having direct access to the files. For example, if you prefer to keep your hefty RAW files on an external hard drive, unless the drive was connected to your computer at the time of work, you could not post-process those images with Lightroom 4 and older versions. Never mind the post-processing, you have no way of even looking at the adjustments you made to those images. I have run into this sort of problem a dozen of times. Creating Smart Previews helps you avoid that sort of situation.
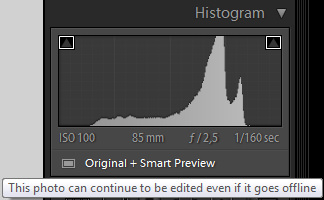
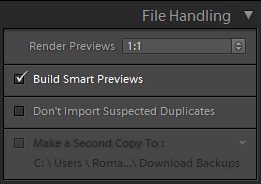
If you check the “Build Smart Previews” check box as you import your images, Lightroom will allow you to post-process photographs in any way you like, even if they are not directly accessible at the time. You can, alternatively, build Smart Previews for all or selected images by clicking on the corresponding setting right below the Histogram, as demonstrated. When creating a Smart Preview, Lightroom 5 essentially stores a small copy of the RAW file in its Catalog folder. The new file is saved in DNG format and takes up a lot less space than the original file. For example, I created a Smart Preview for a .NEF file from my Nikon D700. The original uncompressed file weighs 23.6 MB on my hard drive, while the compressed Smart Preview DNG – a mere 279 KB. Now I am not trying to say that your RAW file will become smaller. Your RAW file stays in the same location and the size does not change. The new DNG file is an additional file that simply stores your smart preview, that’s all. So if you choose to render Smart Previews, the total size of your Lightroom catalog folder will grow, but by a small margin compared to the original RAW file.
Are there any limitations? Well, yes. But a minor one. You can only export the image up to about 2540 px in size on the long edge. Having said that, it is still more than enough for web use. I am yet to find any more drawbacks, but considering how much space you can save on your hard drive whilst keeping the main RAWs on an external drive, the Smart Previews feature is amazing! It is especially useful for those who tend to travel a lot and want to save time by post-processing images whilst on a train or during a flight.
9) Full-Screen Preview
With all the new features that Lightroom 5 packs, the full-screen preview is most likely the least intriguing addition at first glance. After all, it is just a view mode. Hit the “F” key on your keyboard and all you get to do is view the image you are working on in full screen, no panels or tabs. That is all. However, I’m quite certain I use the full-screen preview more often than any other feature in Lightroom:

As I have already said in the Public Beta Overview, the first thing I did when I opened Lightroom 4 is hit the “F” key a couple of times to enter full-screen mode. With Lightroom 5, you need to hit Shift+F instead. Hitting just the “F” key will engage the full-screen preview mode. It is obvious Adobe has given even small details like this a lot of thought. After-all, previewing images is an action you are likely to do more often than change screen modes, and thus should require a simpler key combination. I find myself hitting the “F” key quite often, several times for each photograph I process. Previewing an image in full size without any other distraction is very different than it is with panels and tabs sticking out from the sides of your screen. It gives a better impression on how the image really looks and what else needs to be done to make it look even better. Helps you “take in” the whole photograph as you work on it.
What I find most surprising, is how obvious this feature is. I cannot help but ask myself again and again how come Adobe has not included a full-screen preview in the original Lightroom release! But then the answer is simple. With Adobe’s software, the stuff they add always seems obvious once they add it, but you somehow don’t miss it that much while it is unavailable yet. Go figure. It’s sort of amazing. You can zoom in, too. The Full-Screen Preview does the job somewhat better than engaging Lights Out mode (hit “L” key to engage) for uncluttered image previewing, and also allows you a choice to either see how it looks on a black background (full-screen preview) or a white background that I have my Lights Out settings set to.
10) Video Slideshow
The Slideshow Module has been improved. Most notably, it now supports video files. You can use both image and video files in one slide show, and also add a sound track. As expected, slide shows can be saved in different sizes. If you don’t want video files to play in full length, you can use the Trim Video function to shorten their playback duration. As with Lightroom 4, you can add custom text to every slide, as well as display title or metadata information.
The Slideshow Module will be covered in much more detail in a separate article.
11) Book Module Improvements
The Book Module, first introduced in Lightroom 4, has seen a big improvement in functionality and flexibility. You can now add different types of custom text to pages – ranging from the usual title or caption to metadata information of your choice. You can use the Text Template Editor to create new Custom Text presets. A previously missing page number setting is now also available. There are more text font and color adjustments than before. Everything, as ever with Lightroom, can be saved as a preset for much quicker usage.
The Book Module will be covered in much more detail in a separate article.
12) Hot Keys
Several hot key combinations have been revised. Most notably, the already mentioned full-screen preview mode is now accessed by hitting the “F” key. Previously, you would toggle different screen modes by hitting this keyboard shortcut. To switch between screen modes rather than access full-screen preview, hit Shift+F.
13) Performance and Other Issues
- Full-screen Mode does not show the next image in your selection. This occurs only when you have selected a series of images before entering Fullscreen mode.
- Video playback is not currently supported in Fullscreen mode.
- There is no error message informing that offline photos and videos are not exported to slideshows.
- The slide after a video clip is often not shown. This only occurs when using the Manual Slideshow feature.
- Custom slideshow templates will default to 480×270 on export. This only impacts custom slideshow templates created in previous versions of Lightroom.
- The slideshow appears as a black screen occasionally. This only occurs when a video file is chosen as the first slide.
- Star ratings cannot be applied while previewing or viewing a Slideshow.
- Deleting a book in the Book Module may occasionally cause another book to disappear.
- XMP metadata changes are not automatically written to file when the original file is offline.
- Canon cameras are not detected when using Tethered Capture in Windows 8. This only occurs on Windows 8.
- Offline photos go missing from Lightroom when moving folder of images to a different volume.
- GPS metadata on videos created on an Apple iPhone is not imported.
- Basic metadata is not imported with video files. This only occurs when imported directly from the camera. As a workaround, please copy the files from camera to your hard drive and then import into Lightroom.
- When utilizing the “Merge to HDR” feature with Photoshop, the resulting HDR image contains metadata from the last selected photo.
- Photos adjusted using Process Version 2003 incorrectly display a “Post Crop Vignette: Paint Overlay” History step. Selecting a subsequent History State can reset existing settings that follow that state in the History panel. This reset cannot be undone, effectively deleting any settings that have been applied after the selected History State. This only occurs with images adjusted in Process Version 2003.
- Images exported at less than 1/3 of their original size may not retain Output Sharpening and Noise Reduction settings.
A while ago, I published a short article on “Lightroom 5 Performance Issues”. Many of our readers have replied and shared their experience. As it turns out, Lightroom 5 is slower in some areas than its predecessor. I haven’t tested this thoroughly and cannot provide you with specific numbers just yet, but both Importing and Exporting are somewhat slower. Based on user reports, Lightroom 5 also tends to crash, although rarely. No work is lost during the incident. I have experienced a couple of crashes myself, too. Known ways to resolve this include downloading this ui.dll file and replacing the default one with it in your Lightroom installation directory. Another way (for potentially a different cause) is to delete preferences and restart Lightroom.
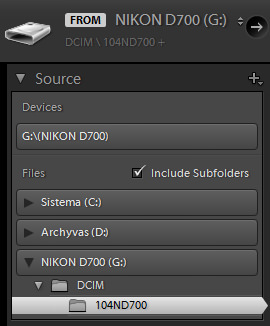
You may also experience slowdowns when using the Spot Removal tool excessively, either while the tool is selected or during regular image browsing within Lightroom. What is more irritating is that Lightroom takes ages to generate thumbnails in Import window when adding images from an external storage device (memory card) or camera. It takes several seconds to generate a couple of lines. Lightroom 4 would load thumbnails much more quickly. Very irritating. Luckily, a few of our readers pointed out a workaround solution. What you need to do is select your memory card or camera from the Source tab on the left-side panel rather than the default Devices tab. It does mean that, after inserting a memory card into your reader, you will need to manually specify the source location. Although time-consuming, it is still much quicker than waiting for Lightroom to load up thumbnails the usual way.
14) Fujifilm X-Trans RAW Conversion
Fujifilm X-Trans sensor cameras were really well received by the photographic community. Many believe, myself included, that Fujifilm has brought innovation and new technology to the market that was becoming a little stale in certain aspects. I am of course talking about the hybrid viewfinder and the new sensor technology that does away with the anti-aliasing and Bayer color array filters. Such a move has ensured superior sharpness provided by the new sensor. It is also very good at handling high ISO noise and brings along Fujifilm’s pleasant color rendering in out-of-camera JPEGs. The downside is that RAW files from Fujifilm X-Pro1, X-E1, X-M1, X100s and X20 cameras are very different from those that come from usual Bayer sensors. Consequently, decoding algorithms are also different. Adobe has struggled to nail Fujifilm RAW file rendering in the past. Has situation changed with the arrival of Lightroom 5? Well, let’s see for ourselves.
The following image was taken with the X-Pro1 and has been converted to DNG and processed with Lightroom 5:

This is a 100% crop (click to enlarge) of the same image with Lightroom’s default sharpening settings:

As you can see, the image is rendered very well. It’s nice and sharp. More importantly, only the most eagle-eyed viewers will notice a trace of X-Trans + Adobe combo specific artifacts. To my eyes, the image looks very natural and any rendering issues that may still be present are not worth the attention. However, what if we increase the sharpening further? The following 100% crop shows the same image, but with increased Sharpening Amount from 25 to 75:

You will notice the paint-like artifacts are much more noticeable in the last crop. To a point where anyone knowing what to expect would be able to spot them quite easily. To be completely fair, I am still not overly worried about this issue – it is bound to be solved sooner or later. Heck, with how well out-of-camera JPEGs are rendered, most people can wait. But there is no escaping the fact that results much better than this can be obtained using the Silkypix software. The following image was processed using the trial version of Silkypix. While it is not identical in its adjustments to Lightroom processing shown previously, sharpening is comparable and artifacts are non-existent. Please disregard any differences in color tone, white balance, etc. when comparing these 100% crops:

X-Pro1 + XF35mmF1.4 R @ 35mm, ISO 200, 1/220, f/5.6
If you compare all three versions, you will notice that the Silkypix conversion is as sharp as the second Lightroom 5 image sample. At the same time, the paint-like artifacts are non-existent as with Lightroom’s default sharpening version. In other words, Silkypix runs rings around Lightroom 5 when it comes to X-Trans sensor RAW file post-processing algorithms. If you bought a Fujifilm X-series camera with the new sensor technology and are absolutely adamant in getting the best out of your RAW files on a pixel-level, make sure to use the bundled software. I doubt it is worth purchasing separately, though. I just wish Fujifilm did itself a favor and provided Adobe with the necessary information to render its X-Trans RAW files just as flawlessly as Silkypix does.


I am very impressed with your post because this post is very beneficial for me and provides a piece of new knowledge to me.
ReplyDeleteWM Capture Crack
Nikon Camera Control Pro Crack
Miracle Box Crack
Traktor Pro Crack
IK Multimedia MODO DRUM Crack